Your first game with Game Maker Studio 2
Part 2:Keyboard input and cursor movement!Welcome to the second part of our Game Maker Studio 2 (GMS2) tutorial! In the last part, we finished the title screen draw and create a script for some font shadow. Today, we will continue with the implementation of some keyboard inputs and the corresponding cursor movement!
In this part we will learn:
- how to use variables
- more about scripts
- how to use alarms in GMS2
Feel free to join this course and make your first steps as a game developer!
Ok, let’s start. We will return to scripts and how to use them. Scripts contain code segments, which are used frequently in our projects. We don’t want to insert the whole code segment each time when we need it, so the transfer of these segments into scripts is very useful. We will use this method to create an input script during this part. We want to put our keyboard checks into one script and call it every time we need it using script(); Another possibility to use scripts is with the involvement of arguments. I will explain this possibility using a script named addition(argument0, argument1); Both arguments are numbers, which are passed to the script. The script adds both numbers and returns the sum. Let’s look at the code:
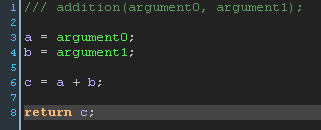
argument0 and argument1 are saved in the variables a and b. The sum of both variables is stored in the variable c and variable c is returned by the script. Therefore, we just need to write for example addition(3, 5); and we value 8 will be returned. Nice!
Enough theory, let’s write our own script. Go to the ressources tree and right-click on Scripts, than left-click on Create. Name the script scr_input and include the following code:
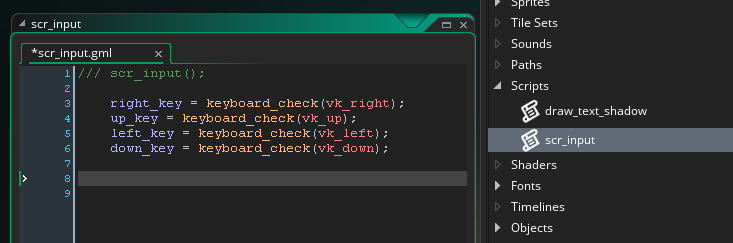
keyboard_check(argument0) is an already implemented script in GMS2. argument0 is the key to check the down state of. keyboard_check(argument0) will return a true or a false* as value (boolean data type). We want to store this value in a variable, in case of our script it’s the variable **right_key for the true/false check of our right arrow key. The code looks like this:
right_key = keyboard_check(vk_right);
Translated: if the right arrow key is pressed (vk_right), the value true will be stored in the variable right_key. Otherwise, right_key equals false. We write this code for the other three directions and we have some very useful code lines, which may be called everytime using scr_input();
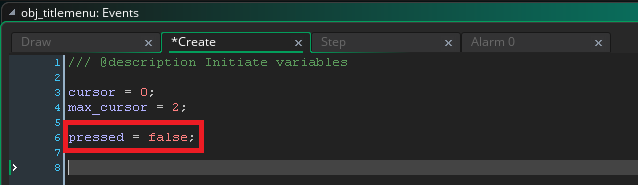
Well, let’s return to our only object, obj_titlemenu. Double-click on this object, we want to add some code lines! First step: add a Create Event using the Add Event button. The code lines in a Create Event will be only called one time, during the instance creation of the corresponding object. Insert the following code lines:
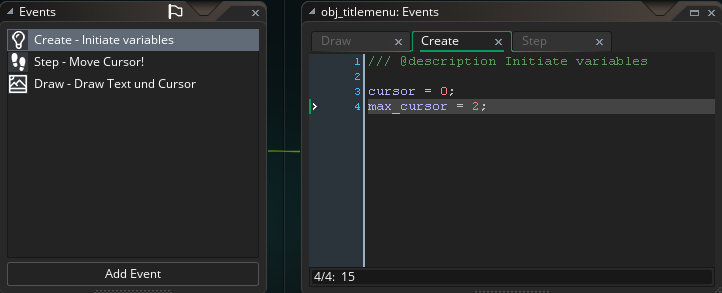
We initiate two variables, cursor and max_cursor. Our title screen has three buttons, Start, Load and End, corresponding to the values 0, 1, 2. Don’t forget, GMS2 starts to count arguments and variables at 0! We use the variable cursor to store our current position in the title menu, the initial value of 0 is therefore the Start button. The next variable is max_cursor. The value of this variable is the maximum number of buttons in our title screen (in this case: 2 is the value of the End button).
Next we add a Step Event. The code lines in the Step Event will be called every frame, in our case 30 times in one second. Insert the following code lines in this event:
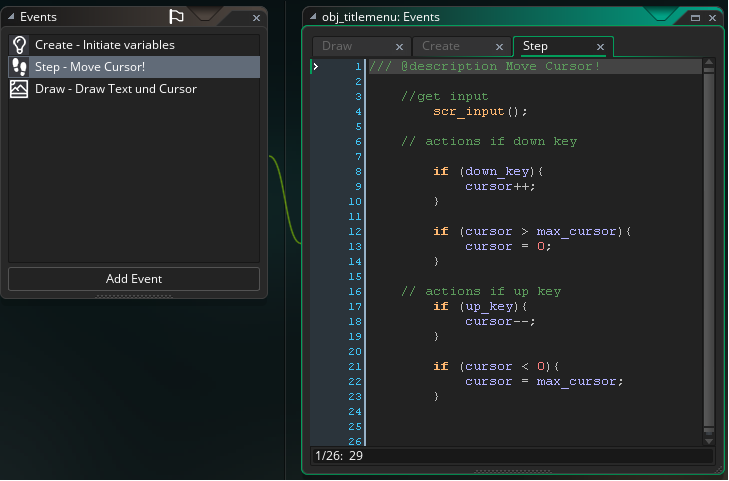
So, what happens here? First, we called scr_input();, giving us access to the variables up_key and down_key. You see, our script is already useful! After that, we include a if-statement. A if-statement takes this form:
if (expression){statement}
GMS2 is evaluating the expression and if this expression is true, the statement will be executed. In our case, we check if the down arrow key is pressed. If this is the case, the value of the cursor variable will be increased by 1 (cursor++;)! Here, we will face our first problem: using the down key frequently, we can reach infinitely high values! Therefore, we include another if-statement, which change the value back to 0, if we reach higher values of cursor than the value of max_cursor. The same concept is used for the up key. Feel free to try it out for yourself! This is your first exercise to test your new knowledge!
Next, we modify some code lines in the Draw Event, look at the red frame:
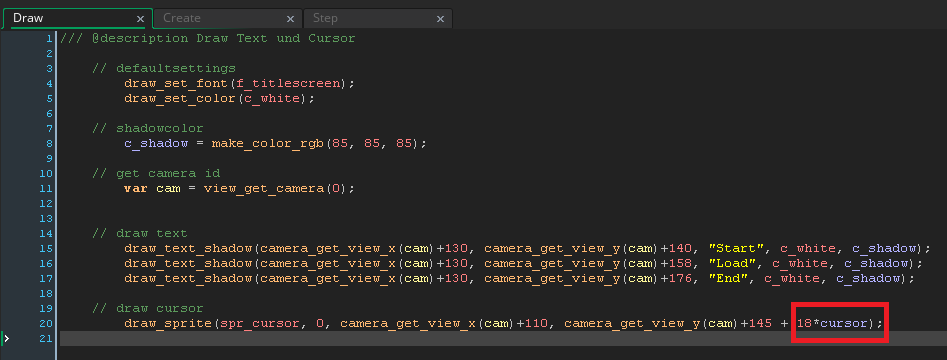
The change the y-value of our cursor from 145 to 145 + 18 x cursor. Why? The distance between the menu buttons is 18 pixel, so we must move our cursor by a value of 18 for every button change. If the value of our cursor equals 0 (Start button), the y-value remain 148. If the value of our cursor equals 1 (Load button), we get a new y value of 163 and the cursor will change the position. Awesome!
Ok, let’s check our game again! Press the play button and look at the result:
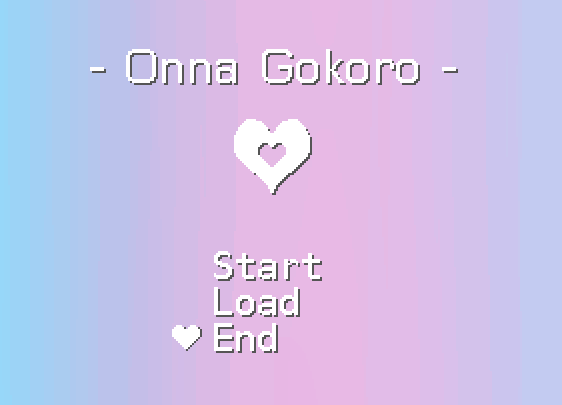
Hurray, it works! We can move the cursor with the up and down key, but the movement is way too fast. Why? The answer can be found in the Step Event. We check for a pressed key every frame, so we change the cursor position 30 times per second. The introduction of alarms will solve our problem and allows us to skip some frames. Let’s do it!
First, we add the variable pressed to the Create Event. The task of this variable is to store the information, if our key was pressed recently or not. The default value is of course false.
Next, we modify our Step Event with the following code:
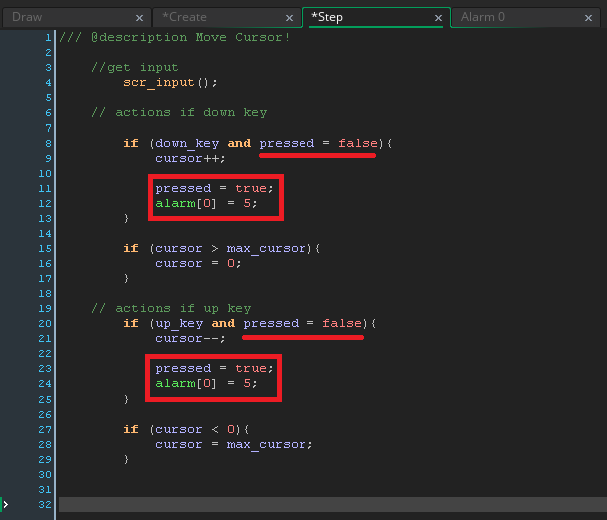
The cursor position will only change (cursor++;), if the down key is pressed AND the variable pressed equals false. Additionally to the position change, the variable pressed will be set to true. Therefore, every following frame is unable to change the cursor position because the if-statement requires true. Unfortunately, we want to allow the position change after some frames, so we set up a alarm using the code line alarm[0] = 5;. Translation: after 5 frames, the code segment in the Alarm Event with the id =0 will be executed! Well, now we have to create this event. Press Add Event, add Alarm 0 and write the following code:
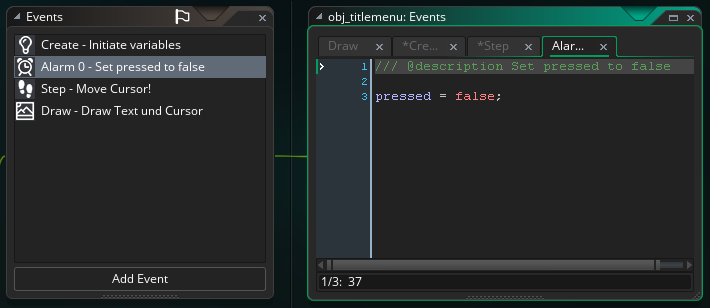
When the Alarm Event is executed, the variable pressed will be changed back to false and the cursor position will change again. We can adjust the amount of checks per seconds if we change the alarm duration accordingly. A very powerful and nice tool in GMS2! The result of this alarm is this gif:
Nice! We can flawlessly change the menu buttons now!
I like to sum up today’s part: we learned a lot about scripts and their usability. We got a feeling how to handle variables and store important informations in them. And last but not least: we learned how to set up a alarm event to adjust time dependent checks. Feel free to leave a comment and see you next time!
Tweet